Saturday, 12 March 2016

GPP3 - Industry LA01 - Internet

Summary
In this unit you will be introduced to the skills needed to access and use the Internet within the printing and graphic arts industry. It includes:
• Internet applications and security
• Locating information on the internet
• Email use
• Industry newsgroups, forums and blogs
LEARNING ACTIVITY 01 Searching
Read through the website on recommended search engines which table the most common
search engine and describe how they work. Can you add to this list?
http://www.lib.berkeley.edu/TeachingLib/Guides/Internet/SearchEngines.html
www.lib.berkeley.edu/TeachingLib/Guides/Internet/Googling_Max-Exercises.pdf
Activity Criteria: Read through the above documents and leave your comment on the Industry 3
Forum titled ‘i3 INTERNET LA01 Searching’. Share your knowledge on this topic. What are your tips on searching for files on the internet?

• Read through the website below on email etiquette. Can you add anything?
Links provided did not work and instead I Google searched 'email etiquette'. Top two results used and linked below.
Share your knowledge on this topic.
• What are your ‘pet hates’ in regards to email etiquette?

My process
1. I accessed the activity resources and links. Followed the links, bookmarked for future reference. Followed activities as suggested.

2. Add to the list of search engines:


3. Add to the Google search terms and resources:

Always remember to to search in just images, video or news. Also, to narrow searches use the search tools to filter region of publish, date and search term. Google Scholar is a data base of research documents and Google Books is a data base of public domain books all available for viewing or downloading and there are many other categories of these databases.

4. By participating in the is activity I have added to my GD resource page;

Recommended search engines Both have been linked under the newly created Technology subheading; as well I have added a public file; Graphic Design online tools/websites document which I will add to throughout the course.

5. Researched email etiquette.

http://www.ict.griffith.edu.au/~davidt/email_etiquette.htm

The links, especially the first one are very comprehensive and I have nothing of value to add. My pet hates with emails and etiquette? Co-workers who do not put an Out-of-office message/notification when they are not in the office for an extended period.  


CSFrost


GPP3 - Technology LA02 - Scanner

Summary
Greyscale vs Line art? Line art drawings (eg. clipart) are handy for photocopying and good for crisp, clean images. Black is the only present colour when scanning in this mode. Greyscale mode must be used to preserve any intermediate tones in the images. Obviously Grey mode has 256 shades of Grey. Greyscale is good for scanning black and white photos, like old historical photos. Learning the differences between these two scanning modes, Greyscale and Line Art can set you on the right path and give you good results. Which scanning mode you choose will depend on the original picture, so it’s important to crop/select the picture before hitting the ‘scan’ button, this will dramatically save on file size and time in scanning. This activity requires you to use a scanner and Adobe Photoshop. There are four parts. Use the scanner as per LA01 instructions.

1. Lineart images – choose a cartoon from newspaper Line art image at the lowest, mid and highest scanner settings. Evaluation of the differences between the three images/files.

2. Greyscale images – old family photo or picture from a magazine.
Greyscale image at the lowest, mid and highest scanner settings. Evaluation: the differences between the three images/files.

3. Lineart image – serviette/paper towel Line art 1200 dpi.

Evaluation of the images, Greyscale vs Bitmap and dpi differences and effects.


My Process


1. Accessed course resources, read instructions.
2. Created Notes document, watched resource video and took notes in visual diary.
3. Located a lineart/B&W image to scan and a greyscale image larger than 5x5cm.
4. Located a hand towel/napkin, checked size and durability.
5. Created tables for images, file size and resolution comparison as per video.
6. Scanned B&W image as per directions.
7. Scanned Greyscale image as per directions.
8. Scanned paper towel as per directions.
9. Populated images into tables with file information required, and completed the assessment of images activity.
10. Commenced creating blog post and will update the GPP3 course forum.
11. Moved from working folder to GPP/Technology3 folder, notes document re-created to become activity document and shared for assessment.


Evaluate the differences

Scanning in B&W/Line art/Bitmap significantly reduces the amount of information recorded, as well as quality. The quality can be improved to reduce the jaggy display of pixels, however the image will only contain two colour areas (one, black).


Scanning in Greyscale significantly increases the quality of an image as it produces a range of colours (shades) between the black and white in an image. This results in up to 256 colour areas being recorded and significantly increasing the file size.


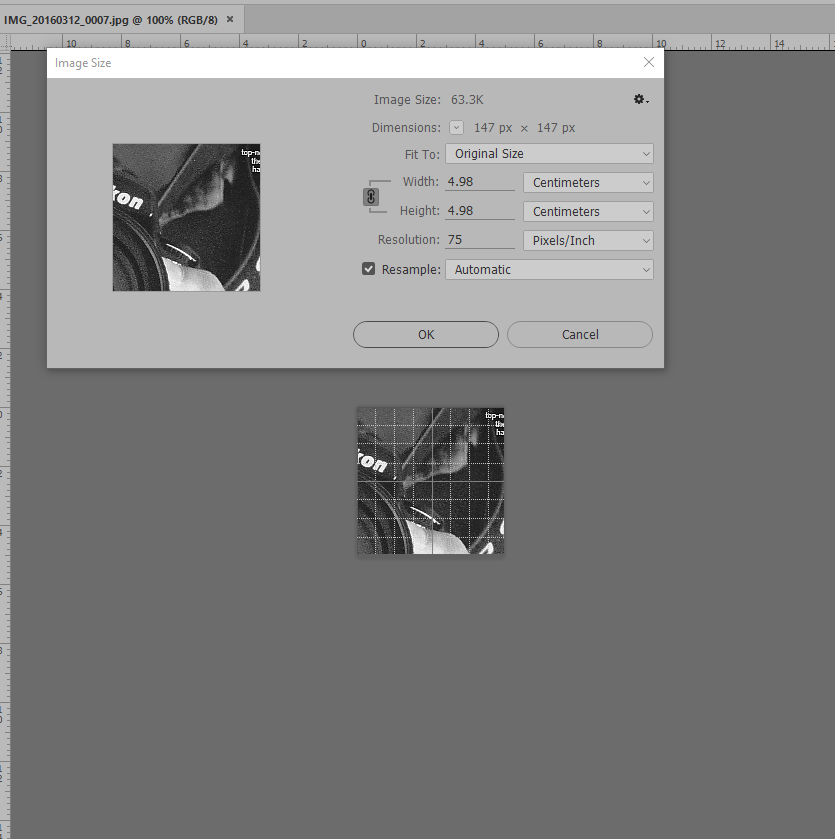
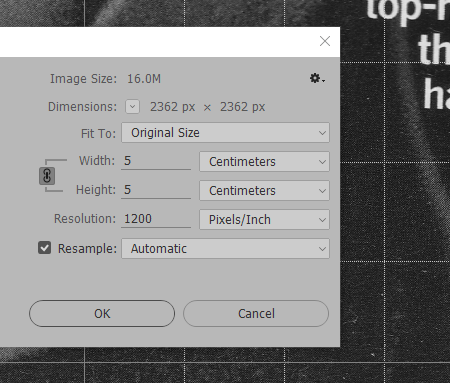
Another difference I noticed when the images were opened in Photoshop was the size of the image within the canvas. All file image areas were 5x5cm, however when displayed on the screen the images were displayed differently. The need to zoom-in on the image demonstrated how much difference in quality/information had been recorded.


2016-03-12 18_34_14-IMG_20160312_0007.jpg @ 100% (RGB_8).png 2016-03-12 18_32_03-IMG_20160312_0005.jpg @ 33.3% (RGB_8).png
The 75dpi (left) and the 1200dpi (right) Greyscale images in the canvas at 100% zoom.


The 75dpi B&W/Bitmap/Line Art image also showed single pixel lines, similar to drawing with the pencil tool and a very small brush.


These images have been saved in this activity in JPEG. Not a standard that is usually used professionally and these file sizes are not indicative of the file sizes of professional digital images and work.


Uses for Bitmap scanning can include capturing of the Thumbnail process or scans of quick sketches as well as for designers and animators who are intending on using the image for vector graphic work. An increase in quality of the scanned image will result in much more professional vector conversion or image to trace.

Greyscale allows for images to be captured in greater detail. However, the cost of this detail is the increase in file sizes. Lower dpi means more noise is captured instead of the smooth gradients over the scale.


Full learning activity can be viewed here.


CSFrost


Wednesday, 9 March 2016

GPP3 - PrePress LA01 - PrePress research

Summary
This activity is divided into five parts –
PART A: Video Research Prepress Video Q and A.
PART B: After the Program Research required after watching the video.
PART C: After the Program Word Search game.
PART D: After the Program Collect examples.
PART E: PrePress Terminology Research prepress terms.
Assessment Criteria:
Complete all the above learning activities for marking in a Word document. Upload this activity to your Blog as well. Clearly label and leave a comment describing what you had to do.

My process:
1. Accessed course material. Identified Learning Activity requirements, and identified additional resources and references;
2. Watched the LA01 Prepressdvd file;
3. Read the ASM, Chapter 6;
4. Re-watched video;
5. Compiled notes on the LA01 Prepressdvd video;
6. Completed Parts A & B;
7. Completed Part E;
8. Completed Part C;
9. Completed Part D;
10. Compiled individual word documents for Parts C and D and reformatted the activity word document for submission. Moved folder from working folder to GPP3 folder in google drive;
11. Completed all notes and final submission, commenced blog post layout;
12. Blog posted and notification to be left on the course PrePress forum;
13. Created a folder for public access to allow for summary of activities to be blogged and access to be available for viewing with the more detailed information. This will be referred to as the Reference file/link.
14. By participating in this activity, I have added new additions to my graphic design resource page. Prepress terminology and Prepress printing comparison guide documents have been created and both have public viewing access (within designated/specific folder in my google drive).

PART A: Video Research Prepress Video; PART B: Video research Prepress Video Q&A Answer these questions in sentence format.
1. List the printing process identified in this program?
The standard processes for commercial digital and analogue printing in Australia consists of many of the following decisions and actions. The printing process is common between the available methods, each having their own specific requirements or restrictions. Printing is not universal and requires different methods, techniques and equipment depending upon what the substrate(s) are to be used and which are available.

The designer must be able to identify which methods are most cost effective, whilst making considerations to the final product and it’s look and feel and what the product is aiming to achieve. This also includes liaison with the printer to discuss scheduling and any possible conflicts with other printing tasks. Timings and availability need to be considered. When the print is required will be discussed as well as types of substrate to be used, substrate purchase (if not available in stock and it’s delivery can take between 6-20 weeks in some instances) as well as the delivery of the final product to the client or distributed as required.

During this process, additional considerations and decisions will be required in regards to the quality and weight of the substrate.

Almost always in digital or analogue printing, the files to be printed are communicated electronically. PDF documents are standard, however printers may be able to use digital files from a graphics program such as Photoshop, Indesign. This method is known as RIP. ‘A raster image processor is a component used in a printing system which produces a raster image also known as a bitmap. Such a bitmap is used by a later stage of the printing system to produce the printed output’. - Wikipedia.

In offset-printing, when the document is received from the designer, each page is imaged onto thin lithographic aluminium plates. The aluminium plates are covered in a light sensitive material and each plate is exposed to one of the 4 CMYK, usually from the colour layers from within the RIP file.

All other colours can be created using CMYK inks using the lithographic printing process. Before printing, all colours within the RIP must be in CMYK. Prior to printing checks will be made to ensure the CMYK colour formats have been used or converted from RGB if applicable.

The printing plates are created through a processing line that is usually fully automated. They can be scanned and produced in under 10 minutes each.

Before printing, proof prints are created. This gives the designer a final chance to review the layout composition, trim and colour confirmation printing commences. The designer should ensure all critical information such contact details, timings, prices/offers and spelling is correct.

Once the client and designer are happy, the designer will authorise the print run by signature and the printer will commence print run preparations. Authority will normally be in the form of a completed purchase order and possibly a printers work order.

Additional services such as spot colouring (silver, gold colours or adding glossy/varnished highlights) can be added to printed pages. Additions such as these are likely to increase the cost of printing, but their additions can have very lasting effects on the final product, client and their customers.

In sequence, the lightest to darkest coloured inks are used. In all methods of printing the lightest colour is always printed first, layering to the darkest, as this ensures the highest possible contrast and clarity of the print.

Once the print has been been made, the ink is dried. This often has to be at high speed in many printing methods. The inks must be cooled/dried before additional processes including folding.

Unwanted areas of the page are trimmed, as well as any registration or control markings. These markings are added to all printed pages to allow the printer to confirm the 4 coloured printing plates are aligned and the colour and density of the print is correct. This process is monitored by computer and cameras which record and analyse the pages when printed at high speeds.

Once cut to size, the pages are collated before being sent for final binding and finishing.

From the client to the designer and printer and designer to the message or product being provided by the client to their audience. Communication is fundamental to achieving the successful and desired outcomes from the commercial printing process. 


PART B:
Research and compare two printing processes outlined in the program to produce a magazine and comment on their suitability or otherwise. Document your findings and answer these questions in sentence format.
Analogue printing: An analogue offset printing process would allow designers to create a print run for a high quality magazine, capable of being presented with many embellishments and other traditional features. The cost of the bespoke features are offset by the reduced costs in printing in this older but cost efficient method.

Digital printing: Whilst the quality of digital printing is comparable, the speed of reproduction is not in digital printings favour. Except if there is a large amount of variation required or desired in the produced content. Normally a magazine would not have much variation, however in a very small and competitive print-media market, a magazine that was personalised and in ways interactive with the reader could be a game changing concept if designed, produced and marketed with user participation.

A comparison between the available commercial printing processes can be found here.

PART C:
Create a puzzle word-search using these printing terms:
Plates; Direct-marketing; Squeegee; Ink; Blanket; Web-press; Impressions; Sheet-fed; Folder;  Substrate; Ink-jet; Screen; Grippers; Electrophotography; Stencil.


PART D:
Collect examples of six different printed materials and attach a description to each item that explains the main features of the printing process used. Set them out in easy steps or diagrams/pictures and clearly show how the processes relate to your examples.

The Family Guy - Box set for Blue Harvest contains a convenient collection of 6 different types of printed materials. The box set comes in a rigid 4 panel gatefold presentation box, which holds all of the the DVD and additional contents. 

PART E:
You are required to prepare a prepress a print glossary. Knowledge of the prepress terminology is a key part for any person working in or dealing with the graphic prepress sector of the printing industry. PrePress printing Terminology


The reference file also contains this activities bibliography and full PrePress 
research learning activity, research notes.

CSFrost


Saturday, 5 March 2016

GPP3 - Design LA01 - My name

Summary
You are asked to provide a specific personality as described in the designated areas on the A4 template supplied. Visualise the characteristics this personality using type only.
Ensure your final artwork is:
• Scanned as A4 vertical
• 72dpi
• RGB mode
• Open in Photoshop and change the Image Size to 700 pixels wide
• Save as a JPEG - myname.jpg
• File size – under 2MB
• Submit using the Design 3 > LA01 Typographic Portraits Forum to share with others, give a description in your message and what did you learn from this activity? Comment on another’s discussion post by providing constructive feedback!


Give special attention to the actual size and placement of your name in the given area. Use your Visual Diary and the thumbnail process to explore your ideas


Process


Researched ‘Thumbnail process’.

The first visual forms of an idea are thumbnail (small) sketches (simple drawings). It is important that they be drawn quickly since you want to record your ideas while they are fresh in your mind”.
http://daphne.palomar.edu/design/form.html

Further development of ideas for alternative design solutions needs to be completed by producing thumbnails”. Graphic Design Australian Style Manual (ASM) Chapter 2, page 67-8. The ASM goes onto state that an idea is a designer’s intellectual property and you should always sign your name at the bottom of the page of your thumbnails with the date and the copyright © symbol.

Use the fastest process available to capture ideas and avoid getting into too much detail. Try to create as many unique ideas as possible and then refine them down to the favoured few.

Watched this video by Alphonso Dunn as he explains his thumbnail process.

My name

By completing this activity, I have learnt that it helps to document (simply and quickly) your ideas so that you can refine your creations and produce them into working outcomes for your projects.

The thumbnail process has been recorded in my visual diary. Signatures/Copyright added to the bottom of each page.

I also dropped on over to Craig's blog and was amazed by his work. Left feedback on the course forum for him, it was all positive and well deserved. Check out his post here. 

CSFrost

Friday, 4 March 2016

GPP3 - Technology - LA01 - Scanner story

Summary
Ensure your final artwork:
• Fills all of scanner area to A4 vertical
• 72dpi (or your lowest setting)
• RGB mode
• Open in Photoshop, resize image – Image > Image Size 700 pixels wide
• Save as a JPEG – call it story
• File size – under 1MB
• Submit using the Technology 3 > LA01 Scanner Story Forum to share with others, give a description in your message, also upload to your Blog. You need to gather 9 objects that represent your story. Think about what sort of objects do justice to your story and look at it from the perspective of your viewer; it needs to "makes sense". Arrange them together on your flatbed, close the lid, cover with a black cloth to stop light coming in the sides and scan them in.


Production:

I have been watching tutorial videos and creating my own digital drawings in Photoshop for much of the last two weeks; With the Scanner story activity I decided to focus on some of the non-digital art supplies I have been amassing. 


I laid out a selection of items covering the scanner surface. I used a green cloth (trying for a green screen effect) to fill empty spaces and a black cloth covering the overall scanner. My lowest DPI setting is 75dpi. I initially scanned using the scanner software, but I did my final import using Photoshop [File>Import>WIA support] into a new document ensuring RGB colour was selected.  

The image was re-sized [Select>Select All, Image>Image size] to 700px Wide. I labeled the 9 items using Text layering for a reference image. Exported the image as a Jpeg renaming to ‘story’ on save. The file size was 575kb, coming in under the required limit of 1Mb. 

Story
I have linked this post on the Technology 3>LA01 Scanner story forum.

Note: The highlighter pen is bright yellow, the spiral ruler cogs are bright green and the Kilometrico pen lid is bright orange ... oh and the scanner light created those rainbow colours down the edge of the metal scale ruler.


... stories:

One: Spiral ruler;
This was an awesome score from Kmart for about $2.
https://www.youtube.com/watch?v=j15moh6lA1Y

Two: Highlighter pens;
Been using them a lot for tutorial notes, but they can be used creatively.
https://www.youtube.com/watch?v=m9pzkmIvHZw

Three: Scale ruler;
A really nice metal ruler, that allows for precise line drawing.
https://www.youtube.com/watch?v=CYtHdmvmrXQ

Four: Pencil set;
Another score from Kmart for about $3.
https://www.youtube.com/watch?v=nDe7kHa6MVo

Five: Scissors;
There is no undo on these bad boys.
https://www.youtube.com/watch?v=MZxtgUoGzMQ

Six: Pens;
Kilometrico pens come in some really cool colours.
https://www.youtube.com/watch?v=Vd_XxELtX7g

Seven: Overlay markers;
Before Photoshop layers, these were some of the tools for marking on transparent plastic overlays. 
http://www.maptools.com/other_tools

See some of the advances in overlay technology here:
http://video.arcgis.com/watch/129/interactive-pen-display-for-gis-and-geodesign

Eight: Drafting template stencil;
Before Photoshop shapes ...
http://www.faber-castell.com.au/55758/Products/Technical-Drawing/Technical-Accessories/fcv2_index.aspx

Nine: Big marker pen.
Who doesn't like big marker pens?
https://www.youtube.com/watch?v=63RJN4W4TUk

CSFrost

GPP3 - Starters - Photoshop Tennis

“Photoshop Tennis”. Is a virtual game whereby students work in pairs to correct one [1] image emailed back and forth to each other. Once each partner has three [3] serves, the game is over and the final image is uploaded and shared to the Discussion Forum.
Posted on the GPP3 blog 22/02/16: ‘Hi there; christiansfrost72@gmail.com if anyone wants to hit an image on over’.

Specifications for the project are 72pi and a max. 700 pixels wide.

I received an email from Craig McKercher. Craig’s blog can be found: http://craigmckercher.blogspot.com.au/ In his introduction post, Craig said that he is inspired by Egyptian Mythology, so I suggested that we use one of the photos I took in Egypt. We created a shared folder in google drive and I dropped in a few images of the pyramids, the Sphinx, some inscriptions and a couple of the sky/clouds. Craig selected an image of the Sphinx with the Khufu Pyramid in the background and made his first adjustments.


Photoshop is a program used by professionals in a wide variety of industries. I have learnt that there is a lot to learn about Photoshop. Sometimes there a few ways to achieve the same result, but knowing which technique works best in certain situations enhances your capabilities. 

There are many tutorials freely available on the web. I started with the basics and introductory videos.  Terry White https://www.youtube.com/user/terrywhitetechblog
have very well produced videos. Once comfortable, I jumped in and made my first edits.

I have now viewed over 100 videos, most between 1-10min long. I have begun practicing techniques and digital drawings following tutorial videos, producing new images https://csfrost.tumblr.com brushes, texture patterns, gradients as well as saving template settings during the process.

If I understood the blending options and tools better, I would have added some Hieroglyphics to the image. However, my limited skills produced poor results so I left them out, settling for a glow around the pyramid and horizon.

Time for more tutorial videos and much more practice.

CSFrost